
Preparing the Drawing
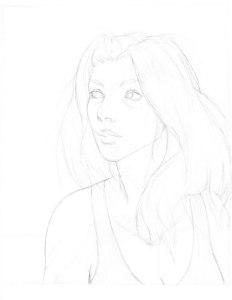
| To start out with, you need a drawing. If you aren't to this point yet, you probably are looking for a different tutorial. For this example, I'm using Jess's "Janet". Sometimes I start out with a much less defined sketch, or do a drawing digitally (usually starting out in Painter 7 and moving into Photoshop), but this is still my most typical way of working. You can see how "dirty" it is - I do work on white paper, but my scanner is small and cheap, so white paper typically looks pretty grey when it is first scanned in, and because I work large (normally 11 x 14 inches), I have to scan it in two passes and piece them together. I typically scan at 200 dpi if I'm going to be working on a printable colored piece then enlarge the lineart to 300 dpi because my scanner hangs if I try to scan anything over 200 dpi, and my computer hates me working on full sized 300 dpi pictures enough as it is, though if your computer can handle it, 600 dpi is a better print standard. Two important things to note: one, while I'm working I save things in an RGB color .psd format. Depending on the number of layers involved and the size of the finished picture, the file sizes can get quite large (up to and over 100 MB a piece). Make sure you have the hard drive space if you're going to be doing a lot of these. Two, in this particular case I've made it a point to include a general guideline for light and shadow. This isn't present in most of my drawings, but it makes it easier to point things out here and can help you if you're having a difficult time deciding where to start shading once you take a drawing from the paper to the pixel. |
 | There are several methods of cleaning up a dirty drawing. Bring down the and then menus. You can try Levels or Brightness/Contrast, but for the most part I prefer to use Curves. You can either click and drag portions of the line running diagnolly across the grid to make brights brighter or darks darker, or you can use the eyedroppers to define white, black, and grey points. For this picture, I found that using only the white eyedropper was sufficient, as I didn't want the lines to be too heavy. Simply click on an area that should be white with the white eyedropper. To set the black one, you would click on the darkest part of your drawing. Depending on your drawing style, how much you adjust the lines at this point can make a big difference in the finished piece - whether you leave them light and low-contrast for a more painterly piece, or start with an inked drawing for very precise illustrative-type work. |
   | In order to start the actual coloring process, we need to be able to color under the lines of the drawing itself. To do that, first select the entire canvas and copy it to a new layer. Then, select the entire background layer and push delete. This should clear out the background layer, leaving it pure white if you're on photoshop's defaults. You can have the background be any color you like, but in this case I'm starting out with white because it enables me to fill in some fine details that I wouldn't be able to see otherwise. Once you're finished with that, reselect layer one and move over to "Channels". Here, move down to the small dotted circle button. That's "Load Channel as Selection". Press it and you should see all of the white areas of the drawing selected. Press Delete. |
  |   |
| Your drawing looks quite a bit different now, doesn't it? Don't worry. From "Layers", check the box to Preserve Transparency, then go over the entire drawing with a large brush at 100% opacity. At this point, black is the only thing you'll need. Because I work very large, you might find that the default photoshop brushes aren't large enough cover things quickly. In this case, it's easy to simply define a new, larger brush from the brush menu. (Something I might cover more in-depth in another tutorial.) |
All images are © 2003 to Julia Lichty. Do not use or distribute these pictures without permission.
« back ¶ email